Digas Studio Guide
Studio setup, basic recording, mobil interview, tips and troubleshooting for using the audio studios.


OBS! Wake up the studio mixer panel
The studio mixers will be in "sleep" mode when not being used, their screens dark. Press the softly pulsing white button called "Home" to wake them up.
OBS! Studio 2 mixer panel ONLY
The left side panel must be showing ONLY Studio 2 microphones and sound sources. The right side panel must be showing ONLY Digas1, Digas2, Digas3 and PC Lyd channels as shown. Reset both panels before you begin; (This is perfectly safe to do and will ensure that these instructions match what is happening on your mixer)
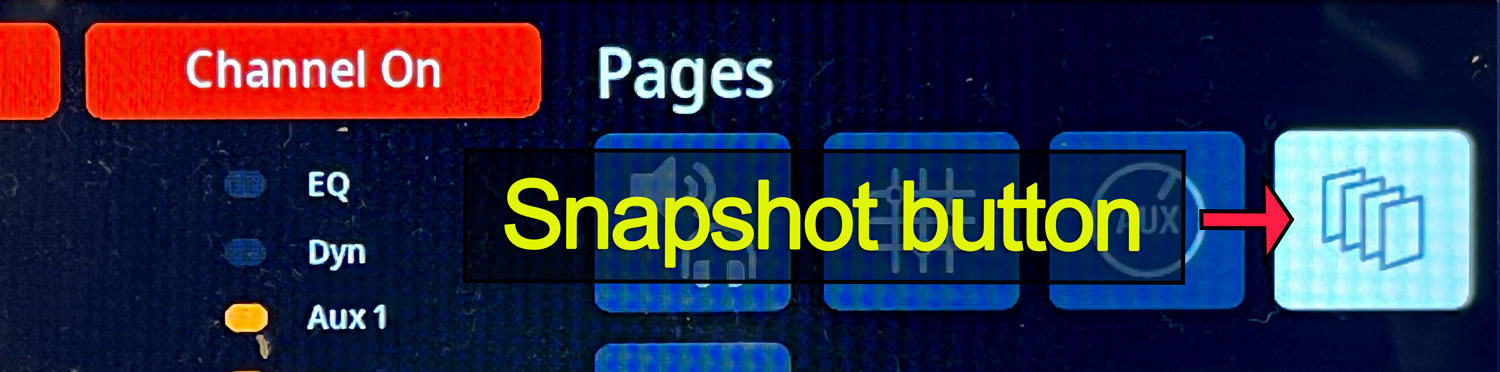
- Press the Snapshot button (in the Pages area, top-right side)
- Press the Studio 2 layout button (1.). It will now be coloured green.
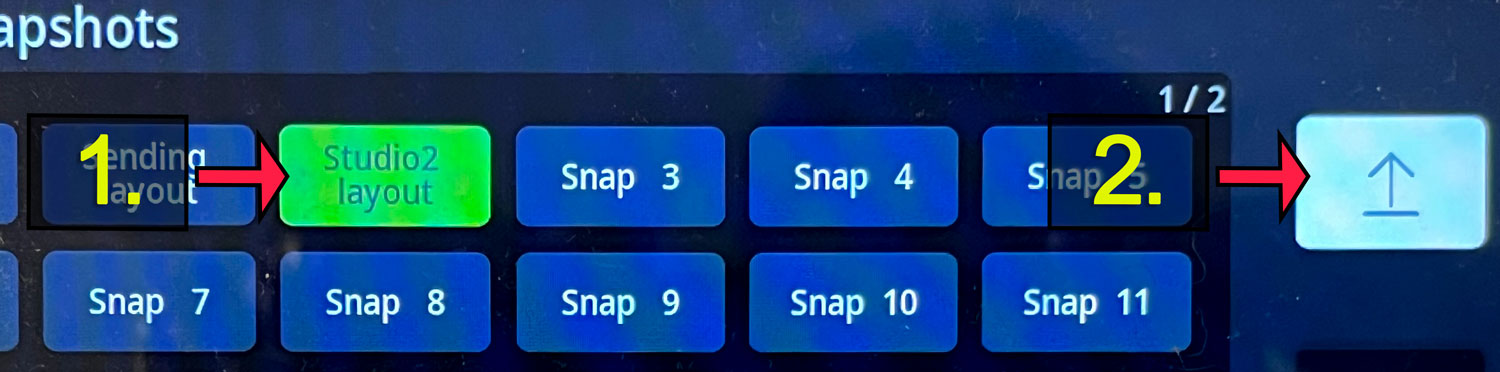
- Press the white upload button (2.) to activate.
- Press the Snapshot or Home button to exit the menu.
Record a block
1. Activate sound for speakers and headphones
- Activate PC lyd mixer channel (slide the fader to the "0" position OR press ON-OFF button)

2. Activate your microphone
- Studio 1 use S1Mic1 for personal recording
- Studio 2 use S2Mic3 for personal recording.
- Press the ON-OFF button OR slide the fader to the "0" position.
- The red "ON-AIR" lamp will illuminate over the interstudio window and outside, above the entrance to the studio
- Activate any other Mic channels for more participants in the recording.
- Press the ON-OFF button OR slide the fader to the "0" position.

- Put on your headphones,
- Adjust the volume of your headphones if needed (Headphones dial on the mixer board)
- You are ready to record.
3. Record with Digas
- Open DBM (Digas Database Manager)
- Click on Råstoff catalogue
- Click the
 icon on the Digas toolbar
 - Give your recording a unique name in the Title field
- Click on the RED circle button. You are now in STANDBY mode, with a blinking red border to indicate you are ready to record.

- Click on the GREEN triangle (play) button. The red border will now be steady red and a timer will start. You are now recording from all active microphones and other mixer channels that are turned on.
- Make your recording.
- Always speak to the "tip" of the mic, never the sides.
- The "level" of sound you are recording should be peaking at around the -15 / -10 on the level indicator on the mixer panel.
- If it is too low, push the fader up for your mic channel to increase the level.
- Mouth to mic distance should not be more than 20cm. Make a fist and put it between your chin and the mic tip. This is the correct distance.
- To end the recording click on the BLACK square button (stop).
- Click on OK to save it to the Råstoff catalogue
- TURN OFF all the microphones (ON-OFF buttons/slide faders all the way down, ON AIR lamp extinguished)
- See the Digas manual for more.
Playback
- Activate “PC lyd” mixer channel (slide the fader to the "0" position/press ON-OFF button)
- Ensure that ALL Microphones are OFF (slide their faders all the way to the bottom/press ON-OFF button)
- Adjust the volume for høytalerene if needed (the Monitor dial on the mixer board, bottom right)
Record a telephone interview
- The setup is identical to the basics as outlined above.
- You will be adding one more step, adding a mobile device connected to the BT channel (Bluetooth)
1. Link the mobile device to the mixer
- Go to the Bluetooth settings on your device
- Turn Bluetooth ON
- In Studio 1: select AeroAudio BT 1
- In Studio 2: select AeroAudio BT 2
- Connect your device
- Confirm that your device is using AeroAudio BT as its speaker and microphone after you connect! This is an issue for some Apple devices and you may need to manually change the speaker from "iPhone" to "AeroAudio BT"
- No AeroAudio BT X to link to on your mobile? Reset the "Connect" button on the AeroAudo BT box behind the mixer. If someone has previously connected to it, but not disconnected, it can get confused. Press the button all the way in, release, then do it again so that the blue ring around the button starts blinking again, ready to connect.
2. Activate the BT and your mic channel on the mixer
- Slide the faders to the "0" position OR press their ON-OFF buttons

3. Prepare for your call
- Put your headphones on
- You will be talking via your studio microphone and listening via studio headphones.
- You will only use the mobile device to connect and end the call.
4. Call the interview subject
- Call using your mobile device as normal.
- When they answer you will make the final adjustments to your setup.
- Adjust the sound level for the BT channel with the fader if it the interview guest is too loud or too quiet.
- Adjust your headphone volume if needed.
5. Activate your recording device
Troubleshooting
No sound from the speakers in the studio
- ALL microphones must be in the OFF position (white ON-OFF lights under all mic channels)
- PC Lyd channel (must be ON and in the "0" position (red ON-OFF light at the bottom of the channel slider)
- The Monitor dial (høytaler volum) is turned up to the "kl.10" position
Studio 2 ONLY: No sound from the speakers, sound from headphones, even if the PC Lyd channel is OFF.
- This is a studio control module error that we are working to correct, but in the meantime a module reset is required and both speakers will need to be power cycled. Contact Ashley for him to come and reset the module, or have him walk you through the procedure. A facetime or Messenger or Teams video call will be the easiest way to get this done.
- Still not working? Contact Ashley via Outlook or Teams ashley@oslomet.no
Studio 1 ONLY: Black mixer panel screen "Styres fra Studio 2" melding
- Studio 2 is connected as a control room. Disconnect it!
- Go into Studio 2.
- On the mixer, locate the Connect button
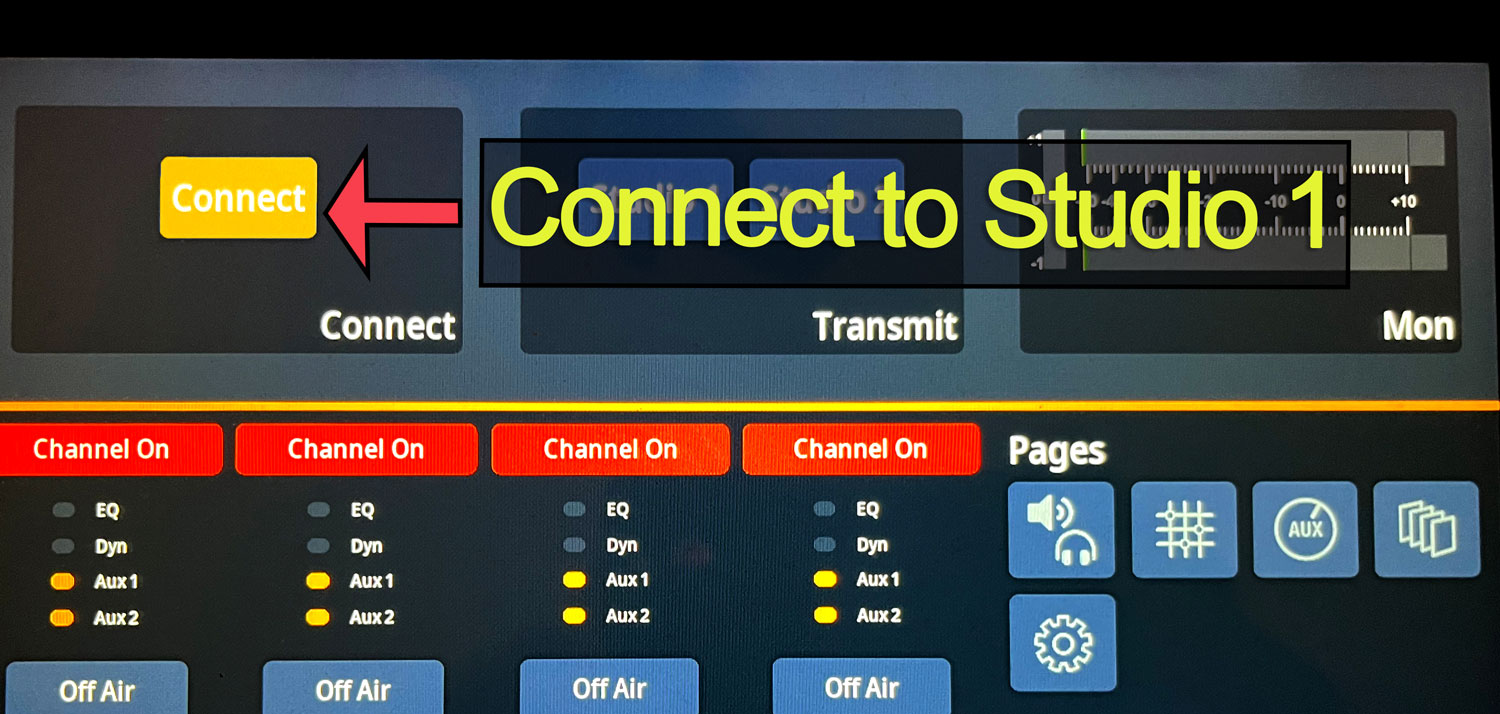
- Press it so it changes from gold to grey
- Check the mixer in Studio 1. It should now be working normally.
Studio 2: no working microphones on the mixer panel
